 |
| Updated Model! |
In preparation for building our large storage cabinet, I updated the model to both try and get a good build flow for the cabinet itself (fewer unique lengths to cut, screws hidden where possible, etc) and to figure out how the door would work.
Since space is a bit tight, I'm going to try and go with a bifold door... should be interesting to build.
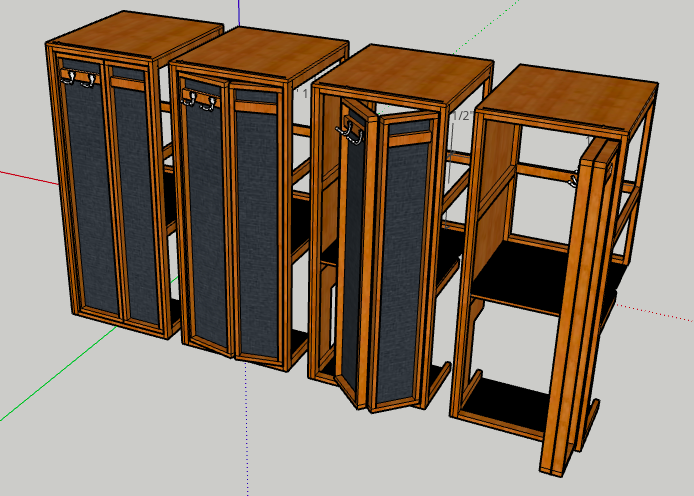 |
| Closed to open |
I wanted to check a couple things before building. First - make sure that when the door is open it leaves as wide an opening as possible. This means making one of the panels slightly longer than the other, as I'm going to connect the root (right side) if the door with a piano hinge to minimize door gaps when closed. The left panel ends up about one door thickness longer than the right - almost.
Second - I had to make sure the door would open and close without interfering with the frame. While opening the overall door width gets bigger before it gets smaller due to the width of the door. The second from left view above shows the critical position. I took 1/8 inch off of the left panel, and will route the leading edge with a 3/8" round over... seems to remove interference without leaving too large of a gap when the doors are fully closed.
 |
| Not a fan of the router... so this should be fun. |
The doors are a bit thick - partly so I could add a place for some coat hangers which would be a little bit inset. The inner panels are 1/4 inch plywood - I'll route out a channel for them and they'll get captured when I screw the door frame together. I was going to wallpaper the panel since that seems... fun... but I think I'll just paint them instead. I might put cork over the right one to give us a message board type thing as well.
 |
| Inset the hangers a bit. Only added these on the left door - the right door will nearly lay flat on the wall when open so no room. |
The bottom of the shelf I'll cover with the nice rubber mat stuff that was used on the bottom of the shelf over the batteries. There is a step in the camper where it hangs over the edge of the truck bed walls - I'm adding a removable panel that will extend that over the full depth of the shelf if needed... or we can remove it.
 |
| The front 1/2 of the upper black shelf is removable. |
I think I can get away without metal guides for the upper and lower roller guide things. I'll buy some standard 3/4 inch top guides for both top and bottom, and route out a channel in the upper and lower pieces of the outer door frame.
 |
| Door guides! |
If it seems like that will be too fragile there is some aluminum channel stock I can get which is about correctly sized... or just buy one of those closet door kits.
The inner two walls which will just be the existing camper siding I might still wallpaperto make it look a bit nicer... sort of not sure but also seems neat.
Athena wanted adjustable shelves on the inside. Since one side where the shelves would mount is the camper side, I'm not sure how to do this cleanly (other than some of those metal shelving rail things... but one bump and I think all our shelves would fall down). So... I'll install the full cabinet before staining and top coating. We can take it out for a weekend and see where we might want shelves, and then I can uninstall, add a couple discrete shelf options, stain, top coat, and re-install.
When we satin and top coat this we can also do the door above the storage above the batteries. I made a quick cover for this but left it bare wood until I had more to stain.
 |
| Inside view, with the Helen the SketchUp Lady for scale. I miss the old dude :( |